Network-attached storage build log
This is a build log of a network-attached storage (NAS) device, or a small home server, built from a thin client. The NAS runs Ubuntu Server, with Docker and Nextcloud installed.
Assemble the hardware
The NAS hardware was assembled mostly following this tutorial (in Polish).
I personally used the following components:
- Fujitsu Futro S900 thin client
- 16 GB SSD with mSATA connector - for the operating system and applications
- 500 GB 2.5-inch HDD with SATA connector - for data
- FDD power to SATA power adapter, with integrated SATA cable, as the motherboard has a FDD connector onboard providing +5V and +12V
- 40 mm fan, attached to the case so that it blows the air at the CPU heat sink, powered at 5 V from the onboard USB header using a DIY-soldered cable; the case has holes so the air from the fan can flow into the case, in the future I may try improving cooling performance by cutting a hole in the case for the fan, so that the air can flow unimpeded.
- some wires and connectors to connect the fan to the USB header, taken from an old PC case

And the following tools:
- screwdriver - there are two sizes of the screws to remove
- bootable USB memory stick
- USB keyboard for OS installation - as the thin client has PS/2 ports, you can also use a PS/2 keyboard if you have one
- a display for OS installation - the thin client has DVI and DisplayPort outputs. I personally used a DVI to HDMI adapter and connected it to a TV, but you can use any monitor that you have
- another computer running a SSH client, on the same network as the NAS
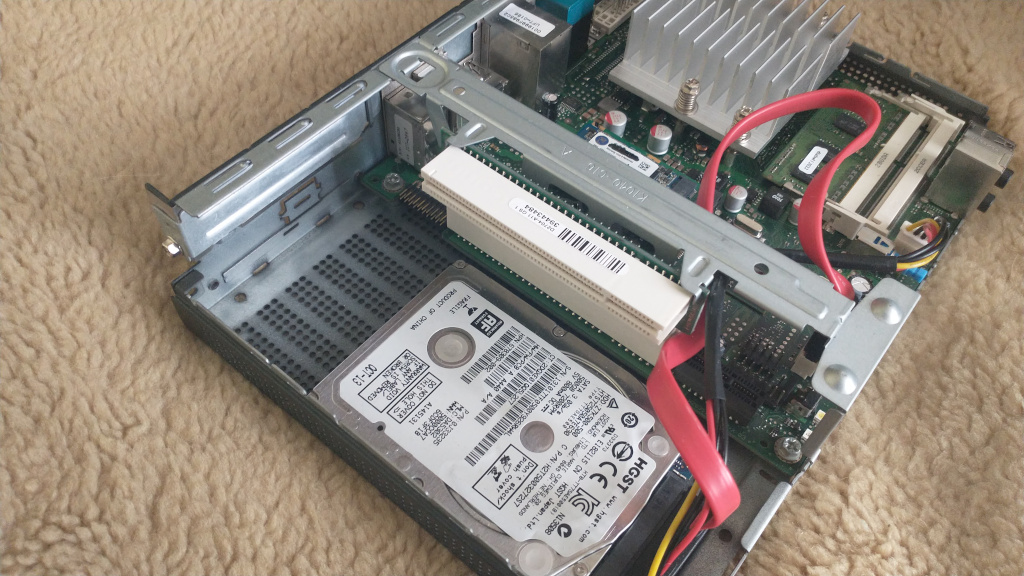
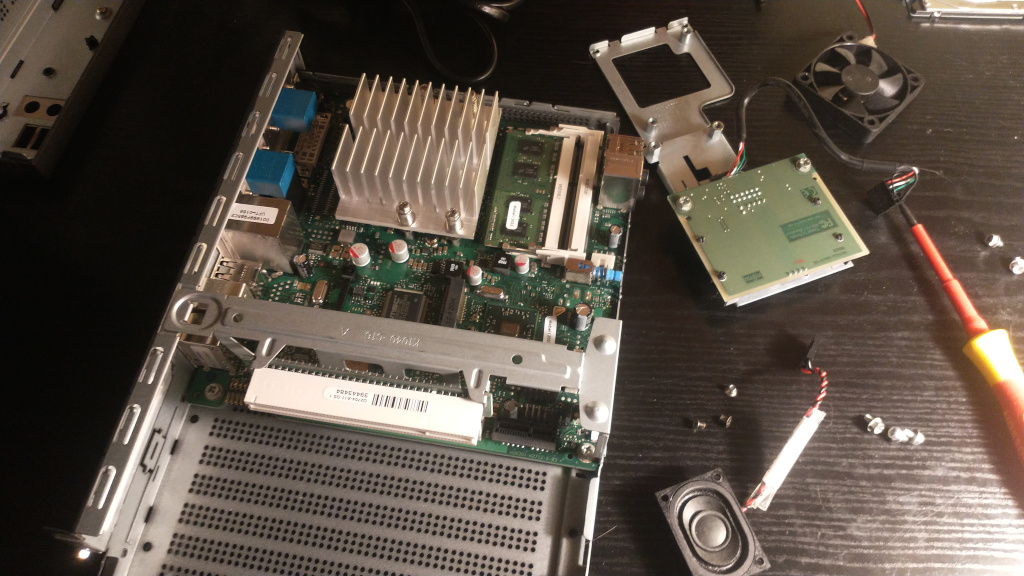
I removed the card readed with the metal tray, to put the HDD in its place. The HDD is not permanently attached to the metal case so far. I also removed the built-in speaker. The motherboard still has a beeper, and it beeps every time the system starts up.

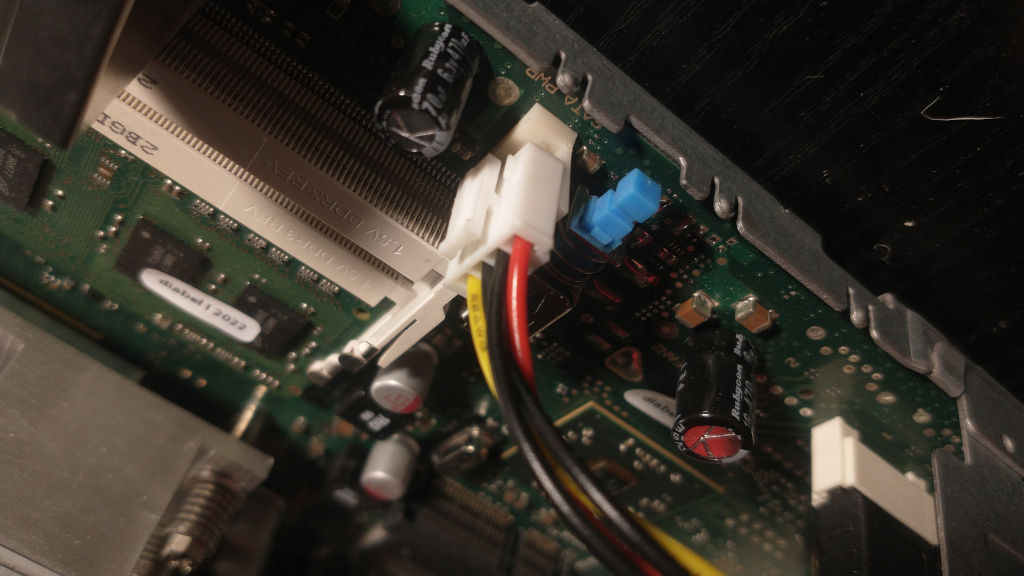
The SATA disk is connected to the motherboard with a cable that has SATA data and power connector on one side, connected to the HDD, and on the other side, a FDD power connector and a SATA plug. The FDD power connector should be corretly connected - the red wire carrying 5 V should be on the side towards the PCB edge, and the yellow wire carrying 12 V should be on the side towards the PCB center.

Finally, I put a thick opaque sticky tape over the power LED, so that it won't disturb people in the room.
Possible future hardware improvements
In principle, more HDDs can be added, by using a PCI-SATA controller (and manually assembling power cables by soldering wires in SATA power splitters to wires in the FDD-SATA adapter), or by using USB to SATA connectors. This way, more reliable RAID setups can be assembled. This can be helpful particularly when using inexpensive second hand HDDs.
Don't forget that RAID is not a full backup - while it protects against a single disk failure, it doesn't protect against accidental deletion of files, or against a fire or a flood.
Install the operating system
Download Ubuntu Server image and install it on a USB stick. I used balenaEtcher to do that.
By pressing delete when starting up, open BIOS menu, and select boot order so that the system starts from USB. After rebooting, select the option to install Ubuntu Server from the menu that will appear on the screen.
I accepted most of the default options. I used the following custom partition scheme:
- mark the 16 GB SSD as bootable
- 16 GB SSD allocated to filesystem root
- 3 GB of HDD allocated to swap
- rest of the 500 GB HDD allocated to home directory (Docker volumes will be kept here)
When presented with option to install SSH, install it, and allow it to login the user with a password. This would be highly insecure if the SSH server was accessible over public Internet - use SSH keys in such case, and harden your installation with tools such as fail2ban AND with additional methods such as nonstandard port.
After the installation completes, remove the USB stick and press Enter, so that the computer will reboot. After startup, the system should allow the user to login with user name and password. Login with the chosen credentials.
Then, install and run ifconfig to obtain your IP address, usually in the form 192.168.0.xxx - you'll be using this IP address to connect to the NAS using SSH. To do that, use the following commands:
sudo apt install net-tools
ifconfig
Don't forget to write down the the IP address. After completing this step, you won't need to use the keyboard and monitor connected to the NAS anymore, and you'll be able to connect using SSH. To do that, from another computer, use the command:
ssh enteryourusernamehere@192.168.xxxx.xxxx
Replace the user name (enteryourusernamehere) with the user name you chose when installing, and the IP address with the address of your NAS (192.168.xxxx.xxxx), as noted down in the previous step. After running the command, you'll be presented with the password input.
After logging in using SSH, you can update the system packages using the following commands:
sudo apt update
sudo apt upgrade
Install Docker
Following the Docker installation instruction using the quick install script, we run the command:
curl -fsSL https://get.docker.com -o get-docker.sh
sudo sh get-docker.sh
Then, following the post-install instruction, we run the commands:
sudo groupadd docker
sudo usermod -aG docker $USER
exit
The last command will log you out of the SSH session. This is required to apply the permissions to run Docker commands without sudo. Disconnect and connect again to the NAS using SSH, to run the next steps.
Verify Docker installation
Verify that Docker runs correctly, using the following command:
docker run hello-world
The command should write a message beginning with Hello from Docker!. Because the container image takes only 13 kB, you don't really need to delete it afterwards, but you can, if you want to keep the list of containers and images clean.
Install Nextcloud
cd ~
mkdir data-nextcloud
docker run -d -v /home/enteryourusernamehere/data-nextcloud:/var/www/html -p 8080:80 nextcloud
The option -p 8080:80 connects the external port 8080 as visible in the host system to port 80 as visible from the container. The code inside the container will use port 80, but the application will be available from other computers on port 8080.
You can verify that by running curl localhost:8080 command, it should return some HTML.
After setting up the container, open a browser and open the URL http://192.168.xxxx.xxxx:8080/ (replace the IP address with the address of your NAS as determined in previous steps). It should show the Nextcloud configuration screen, with fields to enter username and password for the Nextcloud user with admin permissions. Enter these values and click Install. The installation process took several minutes.
After that, you can add some additional apps that extend Nextcloud functionality. I personally didn't install any, they can be installed later. To see the files stored in Nextcloud, select the folder icon from in the top left corner of the screen. There will be some example files added, feel free to remove them.
Check your disk usage
A highly useful command is df - it shows the. In my case, after installing several containers, it displayed, among other lines:
Filesystem     1K-blocks    Used Available Use% Mounted on
/dev/sdb2       15283560 4511008   9974396  32% /
/dev/sda2      476498864   39272 452181272   1% /home
In my case, /dev/sda2 is the partition on the large (but slow) HDD, while /dev/sdb2 is the partition on the small (but fast) SSD.
Disk usage will change depending on what exact software you install.
Install lm-sensors to monitor hardware temperature
Following the tutorial at https://www.cyberciti.biz/faq/howto-linux-get-sensors-information/ you need to run these commands:
sudo apt install lm-sensors- installs the lm-sensors packagesudo sensors-detect- runs autodetection of what sensor drivers (as Linux kernel modules) should be installed - answering "yes" to all question worked for me and nothing apparently broke down; you'll need to reboot to reload the kernel modules.sensors- actually shows the temperature data
The output of sensors command looks like that:
k10temp-pci-00c3
Adapter: PCI adapter
temp1:        +63.0°C  (high = +70.0°C)
                       (crit = +100.0°C, hyst = +97.0°C)

radeon-pci-0008
Adapter: PCI adapter
in0:         888.00 mV
temp1:        +63.0°C  (crit = +120.0°C, hyst = +90.0°C)

sch5627-isa-0000
Adapter: ISA adapter
VCC:           3.31 V
VTT:           1.49 V
VBAT:          3.28 V
VTR:           3.31 V
in4:           1.13 V
fan1:           FAULT  (min =    0 RPM)
fan2:           FAULT  (min =    0 RPM)
fan3:           FAULT  (min =    0 RPM)
fan4:           FAULT  (min =    0 RPM)
temp1:        +63.0°C  (high = +60.0°C, crit = +100.0°C)
temp2:        +50.9°C  (high = +60.0°C, crit = +191.0°C)
temp3:        +50.9°C  (high = +60.0°C, crit = +191.0°C)
temp4:        +50.9°C  (high = +60.0°C, crit = +191.0°C)
temp5:        +50.9°C  (high = +60.0°C, crit = +191.0°C)
temp6:        +50.9°C  (high = +60.0°C, crit = +191.0°C)
temp7:        +50.9°C  (high = +60.0°C, crit = +191.0°C)
temp8:        +63.0°C  (high = +60.0°C, crit = +191.0°C)
In my case, the temperatures are around 59 C when idle (as reported by htop), and when installing a large Docker package, the temperature rises to 65 C. I'm not comfortable with running a task taking 100% of the CPU, so I didn't measure the temperatures under steady 100% load. The ambient CPU load as reported by htop is roughly 3-4%, of which htop itself takes 2.6%. As the thin client doesn't include any fans by default, and the fan I installed is powered from the USB header, the measurements displayed above show "FAULT" for the fan speeds.
There exists a binding of lm-sensors to Python so that the data can be read in Python scripts. In the future, this may be useful for monitoring the system.
Install other software
PostgreSQL
I installed PostgreSQL to have a very slow instance for experiments with query optimization.
This is how I installed PostgreSQL, so that it stores the data on the HDD instead of SSD.
cd ~
mkdir data-postgres
docker run -d -e POSTGRES_PASSWORD=enteryourdatabasepasswordhere -e PGDATA=/var/lib/postgresql/data/pgdata -v /home/enteryourusernamehere/data-postgres:/var/lib/postgresql/data postgres
See PostgreSQL Docker image documentation for more details.
Go back to home page